Things I Love!
▼
24/7 Low Carb Diner Amazon Store
▼
Monday, December 30, 2013
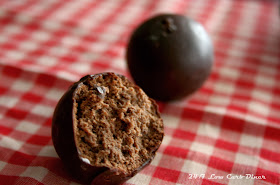
Chocolate Almond Cheesecake Truffles
Christmas may be gone, but New Year's parties are just around the corner. This is a sweet little cheesecake truffle that features one of my Christmas presents from the hubby. Cocoa Almonds. Yum. I love those... in moderation. While I have been known to spend a little extra to buy the hundred calorie packets, John got me the warehouse club version. Caution ahead! All too easy to eat them without thinking! I may need to portion them out for myself, then hide the packages in the freezer. Do you have as much trouble limiting nuts as I do?
With the new year ahead, I have decided to refocus my diet a bit. Let's not put on airs. I always seem to fall off the bandwagon during December, then get very serious in January. Not that I recommend it, but it does seem to be a recurring behavior for me. The last couple of years, I did a Whole 30 paleo style. I hate going too long without some cheese, though. It is my favorite food. This year, I am delving into the nutritional ketosis w.o.e. I will be watching my fat to protein to carb ratios to be sure I stay in a state of ketosis. Those requirements will vary for everybody, but I am striving to be around 75 % fat, 20% protein and 5% carbs for each day's totals in January. In fact, the January Diner News is devoted to recipes and meal plans to fit the nutritional ketosis ratios. Of course, they will be good for any low carber, but especially helpful for those wanting to up the fat, have moderate protein and very low carb. I hope it will make me feel better from the far too many cheats I had this holiday season. It would be a good way to get some nice keto meal plans if you want to give it a try too. Yah, I know this is not new science, and there is lots of great advice out there. Just not enough meal plans already done!
This recipe will fit nicely into that plan. Each truffle has 58 calories, 5 g fat, 2 g protein and 1 net carb. That is 81% fat with 10% protein and 10% carbs. I think the carb is actually a bit lower percentage because that is figuring on total carbs, not net. I haven't yet figured out how to make my new software analyze it on net carbs, but I am trying. I hate cooking being about math, but sometimes, we have to count to see what we are really eating. It is so easy to fool ourselves!
So forget the math, these truffle are wonderful regardless of your eating plan. They are easy to make and will be a hit for your New Year's Eve party. You don't have to use the cocoa roasted almonds--they do have a teeny bit of sugar in them. The recipe would be fine with plain roasted almonds and perhaps another teaspoon of cocoa powder.
Chocolate Almond Cheesecake Truffles
3 ounces Cocoa Almonds (Emerald or Planter's) (about 2/3 cup whole)
8 ounces cream cheese
1/4 cup cocoa powder
1/4 cup Swerve powdered sweetener
Stevia equal to 10 tsp
1/4 tsp almond extract
3 tbsp blanched almond slivers (optional)
In a bullet blender, finely chop the almonds. Remove 2/3rds of the nuts from the blender and set aside. Pulse the remaining nuts a few more times to make a finer grind for the coating of the truffles.
In a medium bowl, combine softened cream cheese with the cocoa powder, sweetener, stevia and almond extract. Stir by hand or with and hand mixer. Stir in the nuts by hand. Let this mixture chill for 30 minutes. Using a small scoop, make 24 truffles. Put the remaining ground almonds on a plate and roll each truffle to coat. Place an almond sliver into each truffle if desired. Serve in mini muffin papers if desired.
Each truffle has 58 calories, 5 g fat, 2 g protein and 1 net carb.
Sunday, December 22, 2013
Christmas Brunch Yogurt Parfait Bar
We are planning a Christmas Brunch for the family this year. Among the breakfast casseroles, gingerbread waffles, candied bacon and other goodies will be this treat. Mini Yogurt Parfaits. Forget the yogurt cups. It is so much more special to be able to build a multi-flavored parfait with delicious nut crumble granola between the layers. Because we will have lots of foods to choose from, I will provide various sizes of small glasses so we can choose the size of our individual parfaits. From the smallest shot glasses to the standard juice glass, this will work great for all appetites and is really cute too. You can layer three different flavors of yogurt with a delicious nut mixture in between, or you can go with one favorite flavor.
I often make individual yogurts flavored with my own flavorings, but using a large tub of unflavored yogurt. That way, I can control the sweetener and additives. I have several favorites of Capella flavorings, but you can use all sorts of things for flavoring. Besides the ones I will give the recipes for, don't forget about coffee flavorings, syrups, fruit and even nut butters.For my holiday buffet, I am choosing to place my yogurts in a decorative ceramic muffin pan. Serving bowls of any kind will do; I just like to look festive when possible.
To make 6 flavors, I used one 32 ounce container of Brown Cow yogurt, plain and unsweetened. The sweetener I have been trying out lately is one mentioned in our new Among Friends books--Natural Mates Stevia and Erythritol blend. It is very concentrated. One tiny scoop is equal to 2 tsp sugar or one packet substitute. No maltodextrin to bulk it up though. I like to blend stevia and erythritol--I prefer the taste over either sweetener alone. This is an easy way to do it. The powder dissolves really easily and is 100x sweeter than sugar. Some people have a problem with stevia tasting bitter. I am not especially sensitive to that, but if you are, you might choose the sucralose and erythritol blend instead. The stevia blend has no GMO ingredients, no calories and no artificial sweeteners. You might want to try it. It is on Amazon here. In these recipes, I am saying how much sweetener I used. You may need less or you may need more. I suggest adding a little less and adding sweetener until you arrive at your personal flavor zone. Every taste is different, and I am one who loves dark, dark chocolate, so I am cautious when it comes to recommending the right amount of sweetener. The same goes with the Capella drops. Add a drop or two less then add and taste until it is best for you.
Italian Eggnog Yogurt
3/4 cup plain yogurt
14 drops Capella Italian Eggnog flavoring
2 drops Capella Butter flavoring
3-4 scoops Natural Mate Stevia and Erythritol Blend or any sweetener equal to 6-8 tsp sugar
Blend all ingredients together.
Red Velvet Cheesecake Yogurt
3/4 cup plain yogurt
1/4 tsp LorAnn Red Velvet Emulsion
8 drops Capella New York Cheesecake flavoring
3-4 scoops Natural Mate Stevia and Erythritol Blend or any sweetener equal to 6-8 tsp sugar
Blend all ingredients together.
Maple Bacon Yogurt
3/4 cup plain yogurt
2 drops Capella Sizzlin Bacon flavoring
1/4 tsp maple flavoring
3-4 scoops Natural Mate Stevia and Erythritol Blend or any sweetener equal to 6-8 tsp sugar
Blend all ingredients together.
Cinnamon Danish Swirl Yogurt
3/4 cup plain yogurt
12 drops Capella Cinnamon Danish Swirl flavoring
3-4 scoops Natural Mate Stevia and Erythritol Blend or any sweetener equal to 6-8 tsp sugar
ground cinnamon
Blend all ingredients together. Garnish with a sprinkle of ground cinnamon
Amaretto Yogurt
3/4 cup plain yogurt
2 Flavor Creations Almond Amaretto coffee flavoring tablets
1/4 tsp almond extract
3-4 scoops Natural Mate Stevia and Erythritol Blend or any sweetener equal to 6-8 tsp sugar
Blend all ingredients together.
Very Very Vanilla Yogurt
3/4 cup plain yogurt
1/2 tsp vanilla extract
3-4 scoops Natural Mate Stevia and Erythritol Blend or any sweetener equal to 6-8 tsp sugar
Blend all ingredients together.
The Nut Layer
3 tbsp butter
1/4 cup sliced blanched almonds
1/4 cup pumpkin seeds
1/4 cup finely chopped walnuts
1/4 cup almond meal
2 scoops Natural Mate Stevia and Erythritol Blend or any sweetener equal to 4 tsp
In a small skillet, melt butter. Add all the nuts and nut meal. Stir continuously for about 5 minutes or until lightly browned. Sprinkle in sweetener and mix well. Let cool.
To build the parfaits, simply layer the nut mixture between layers of flavored yogurt.
Make these up on Christmas Eve, and pull them out for an almost instant breakfast while everyone checks the stockings or opens packages--whatever your tradition. Enough to tide you over til the big meal, or a compliment to a meat and egg casserole. Of course, you don't have to save this idea just for holiday brunches. I like to make lots of flavors from one container of yogurt and pack them in small containers for quick breakfasts or something sweet in my lunchbag. Do what fits you!
Sunday, December 15, 2013
Wrights Liquid Smoke Giveaway
We have some winners for the Wright's Liquid Smoke Giveaway!
This stuff is amazing in marinades. Delicious in meatloaf and burgers. It makes great barbecue sauces. It adds a unique touch to chicken and tuna salads. Breakfast casseroles like my Smoky Okie. So many possibilities.Now it is your turn to try it out.
If your name is listed below, please send me a message with your mailing address. To keep information nice and private, just use this link to go over to the Diner site and give me the information via our contact page. That is safe, I promise! Now to the winners...
Michael Haley
Nichole T.
Adele Forbes
Carla Prasad
It is not too late to enter Wright's Sweepstakes though. You can enter everyday until Dec. 20th. Don't forget you can use your bottle to make this incredible chicken salad. The Applewood Smoked Chicken Salad is perfect for holiday gatherings.
Thursday, December 12, 2013
Wright's Liquid Smoke Giveaway and Smoked Cheese Spread
I don't endorse very many products directly. Wright's Liquid Smoke products are an exception. I think the flavor if their product is superior to all other liquid smoke products I have tried. I found them when my son was on the SCD protocol and could not have added soy products, gums and many colorings and other additives. This product is all natural and delicious. No caramel coloring. It is really from condensed smoke. Read about the process here.
Wrights contacted me recently about a contest they are sponsoring. It is Deer Days Sweepstakes. Seems I don't have any hunters who headed out to bag a deer this season. Actually, none of my men have ever tried. So, I did not have any venison recipes to offer up. That doesn't tarnish my appreciation for liquid smoke at all, however. We all have the same chance to win the sweepstakes--a $500 Bass Pro Gift card. Heck yah with all the guys in my family, we could spend that easily! For a chance to win that, head on over to their Facebook page, like it and enter. You can enter every day.
But it doesn't stop there. They sent me some coupons for free bottles too. I have been wanting to get my blog followers up, so I am giving away coupons for new followers. I only have a limited number, though. So here's how it will work. Every new follower up to this Sunday Dec. 15 will be entered in a drawing. I will publish the names of those I draw. If your name is drawn, you will email me with your mailing address and I will send the coupon. I also want to give my newsletter a boost, so new subscribers will also get an entry. To order the Diner News for 2014, go here. I will publish those names here on the blog on Sunday as well.
Then lastly, I want to give all my tried and true Diners a chance to win a bottle. So, you longstanding followers, leave me a nice comment here and I will add you in a drawing as well. Then you come back Sunday and look for your name. Remember, I will just be mailing you a coupon. You can redeem it for a bottle at your retailer. I won't be mailing a bottle.
If you don't care about free stuff, just run out and buy your own bottle and make this recipe. I created this recipe a couple of years ago and still love it. It is a great addition to holiday parties.
Smoked Cheese Spread
6 ounces Colby/Monterey Jack marbled cheese, shredded
2 tbsp water
1 tbsp prepared mustard
1/2 tsp salt
1 tsp butter
1 tsp Wright's Liquid Smoke
2 beaten eggs
In a small saucepan, combine shredded cheese, water, mustard, salt, butter and liquid smoke. Over very low flame, stir constantly until the mixture is melted and free of lumps. Keep warm. In a separate bowl, beat eggs. Remove sauce pan from heat and remove a few tablespoons of hot cheese to temper the eggs. After the cheese is incorporated, slowly add the egg mixture into the saucepan with cheese, stirring well after each addition. When all the egg is stirred in, place the sauce back on the stove and heat gently until mixture is thick. Pour into a crock, cover and chill.
This recipe is great. The smokey cheese flavor is wonderful with low carb crackers, but it is also perfect on burgers or scrambled eggs. Give it a try. And give the Sweepstakes and sample giveaway a try too.
Monday, December 9, 2013
Chocolate Raspberry Cake Balls
Still snowed in here. I am getting cabin fever with school cancelled and all. Had I known, I would have stocked up on ingredients to test a bunch of new recipes. Oh well. Today's delicious little cake balls have no real raspberries. Who can get those in the middle of an ice and snow emergency? Lucky for me, I have a bottle of chocolate raspberry flavoring for coffees. Those really can add a lot of interest to basic recipes, so don't just save them for your coffee. I just finished up this little bottle, so I will add this flavor to my next order of Capella Drops. Maybe you should too.
These cake balls are so simple to put together. I use my cake pop appliance. So easy--no stick, no clean up, and they bake in only 5 minutes per batch. The whole recipe bakes in less time than I would have them baking in the oven. You can make them as mini muffins too though. The batter is a coconut flour base with lots of chocolate flavor. If you prefer almond flour, try this recipe. The coating is a yummy coconut oil glaze that is perfect. Not messy like a frosting, not full of sugar like a candy bark. I used an unrefined coconut oil, so there is a bit of that flavor, but you can use refined so all you taste is the chocolate raspberry. You might want to do a better job of covering that skewer hole than I did, but hey, these are not for a fancy party, just for us, so....Martha I am not.
Chocolate Raspberry Cake Balls
Cake:
1/4 cup coconut flour
1/4 cup cocoa powder
1/4 tsp salt
1/4 tsp baking powder
1/2 cup Swerve or any sweetener equal to 1/2 cup sugar
3 eggs
1/4 cup mild flavored oil, melted butter or melted coconut oil
10 drops chocolate raspberry flavoring (more or less, depending on brand and taste preferences)
up to 1/4 cup water or almond milk
Coating:
1/4 cup coconut oil
1/4 cup cocoa powder
3 packets (6 tsp equivalent) stevia
5 drops chocolate raspberry flavoring
In a medium bowl, combine the dry ingredients. Then stir in the eggs, oil and flavoring. If using coconut oil, you may need to briefly heat the batter to remelt the coconut oil, as it can sometimes solidify if the eggs are cold. Add water or almond milk if the batter is still too thick. Fill the wells of the cake ball appliance with slightly rounded spoonfuls of batter. Bake for 5 minutes. Remove and let cool. Repeat until all the batter is used. My machine makes 15 cake balls. Before dipping the cakeballs, place them in the freezer.
In a very small cup, melt coconut oil. Stir in the cocoa powder, stevia and raspberry flavoring. Adjust sweetener to taste. Pierce each partially frozen ball with a skewer. Dip the ball into the glaze and shake off excess. Place on a plate and let the coating set up. Use the remaining coconut oil to make a few pieces of chocolate bark. Just pour it into molds or onto waxed paper and break up when cool.
Serves 6: 236 calories 2 net g carbs (7) 5 g protein 22 g fat
These cake balls can be muffins as well. 6 regular or 12 mini muffins, I am guessing. Play around with different flavors for this basic recipe. You could add some shredded coconut, or some other flavorings--mint perhaps? I love cake balls. They are perfect for quick little snacks, go great in lunch boxes, and help with portion control. If you don't have a cake pop machine, consider asking for one for Christmas!
Get more great recipes at the Low Carbing Among Friends Facebook Page: https://www.facebook.com/LowCarbingAmongFriends
Order any of our great cookbooks at http://amongfriends.us/24-7-LCD.php
Order my original e-book or the latest version for couples and singles, A Table for Two here.
Saturday, December 7, 2013
Cranberry Crumble
First, do the sauce. It is easy. If ya want, reserve some to eat the traditional way. The filling in a crumble is pretty forgiving.
Gingered Orange Cranberry Sauce
1 bag (12 oz) fresh cranberries
1/2 cup water
1 tsp liquid stevia or sweetener equal to 1 cup sugar
1 tbsp finely grated fresh ginger
2 tbsp fresh orange juice or one packet True Orange crystals
Place berries and all the other ingredients into a saucepan. Cook over medium heat until the berries begin to pop and the sauce thickens.
Now granted, mine were leftovers, but I also only made a half recipe of the crumble. Go ahead and make the whole thing. It is sweet and tart and makes you happy if you love the humble cranberry. If you are working from leftovers, half the recipe. Yes it is tough to half an egg.
On to the dessert...
Cranberry Crumble
3 cups almond meal (or blanched flour)
1/2 tsp salt
1/4 tsp baking powder
1/2 cup erythritol blend or any sweetener equal to 1/2 cup sugar
1 egg
1 tbsp vanilla extract
1/4 cup mild oil or melted butter (I used MCT oil)
4 tbsp erythritol or any granular sweetener
3 tbsp chopped pecans or walnuts
1 recipe sugarfree cranberry sauce
Place almond meal, salt, baking powder and sweetener in the bowl of a food processor. (If using stevia or a liquid sweetener, add it to the wet ingredients instead) Process to mix. In a small bowl, combine the egg with the vanilla and liquid sweetener if using. Add it to the food processor. Add the oil slowly through the feed while processing. Process until the mixture just combines and remains loose. Do not process into a ball of dough.
Remove one cup of the nut mixture and set it aside. Press the remaining dough into the base of an 8 inch casserole or small pie plate. Bake the crust for 12 minutes at 350 degrees. Remove the crust from the oven and spread the cranberry sauce over it. Add the 4 tbsp of granular sweetener and the pecans or walnuts to the reserved dough. Use a fork to break it up. Pour the nut mixture crumbles over the cranberry sauce. Return to the oven for 15 minutes. To serve, scoop the crumble out with a large spoon or cut into squares and remove carefully.
This is a delightful holiday treat. I made a crust so you can serve it as squares if you like. Or you can make it in individual ramekins. You can just scoop it out like a cobbler too. The nuts go well with the bite of cranberry. A bit of whipped cream would add yet another dimension. Top with whipped cream or vanilla ice cream if you like. Let's hear it for leftovers!
Sunday, December 1, 2013
Red Velvet Cookie Cheesecake Cups
It's here....the holiday season is truly upon us. I have to admit, with all I have going on, it has snuck up on me this year. Last week was a Hanukkah party at school, Thanksgiving and my birthday. You would think the approach of Christmas would be no big deal. Traditionally, this is the weekend we get our tree up. Not so this year. I have been working on the Diner News all weekend it seems. It is a good one, with lots of good ideas and new recipes especially for Christmas.
These Red Velvet Cookie Cheesecake Cups are so cute. I have seen a similar recipe that used a boxed red velvet cake mix. These babies, however, are completely low carb and sugarfree. Woohoo. Tasty too.
Begin by preparing the cookie shells. In a medium bowl, combine almond flour, erythritol, coconut flour, xanthan gum, and salt.
In a small bowl, combine melted butter, egg, vanilla, red velvet flavoring and stevia. Add the wet ingredients to the larger bowl, stirring by hand to combine. Roll the dough into 24 balls and place each ball in a mini muffin pan. Use a rounded measuring spoon to create a well in the dough. With your thumb, depress the edges to create the shell. Bake for 10-11 minutes at 350 degrees. Let cool while you make the filling.
If you would like to order the Diner News, filled with even more holiday treats, plus ideas for party food, festive dinners, and cozy evenings by the fire, the head over the the Diner website and order a full year of newsletters for just $6. http://www.247lowcarbdiner.com/html/newsletter.html
Here are a few other things in this issue to tempt you.
Now to get to that tree...maybe.
These Red Velvet Cookie Cheesecake Cups are so cute. I have seen a similar recipe that used a boxed red velvet cake mix. These babies, however, are completely low carb and sugarfree. Woohoo. Tasty too.
Red Velvet Cookie
Cheesecake Cups
Cookie Cup:
1 1/4 cup blanched almond flour
1/4 cup granulated erythritol blend
2 tbsp coconut flour
1/2 tsp xanthan gum
1/8 tsp salt
1/4 cup melted butter or mild oil
1 egg
1 1/2 tsp vanilla extract
1/4 cup granulated erythritol blend
2 tbsp coconut flour
1/2 tsp xanthan gum
1/8 tsp salt
1/4 cup melted butter or mild oil
1 egg
1 1/2 tsp vanilla extract
1 1/2 tsp Red Velvet Emulsion (LorAnn brand)
10 drops stevia
10 drops stevia
Cheesecake Filling:
4 oz heavy whipping cream
4 drops stevia
4 oz softened cream cheese
1/2 teaspoon vanilla
1/4 cup powdered erythritol blend
Begin by preparing the cookie shells. In a medium bowl, combine almond flour, erythritol, coconut flour, xanthan gum, and salt.
In a small bowl, combine melted butter, egg, vanilla, red velvet flavoring and stevia. Add the wet ingredients to the larger bowl, stirring by hand to combine. Roll the dough into 24 balls and place each ball in a mini muffin pan. Use a rounded measuring spoon to create a well in the dough. With your thumb, depress the edges to create the shell. Bake for 10-11 minutes at 350 degrees. Let cool while you make the filling.
With an electric mixer, beat the cream until stiff. Fold in the stevia drops. In a separate bowl, blend the cream cheese, vanilla and powdered erythritol. Add the whipped cream by hand, stirring until incorporated. Spoon the cheesecake filling into the cookie shells. Alternately, fill a pastry bag with the cream cheese mixture and pipe it into the cooled cookie shells.
Each cup has 89 calories 1.13 g carbs 8 g fat 2 g protein
If you would like to order the Diner News, filled with even more holiday treats, plus ideas for party food, festive dinners, and cozy evenings by the fire, the head over the the Diner website and order a full year of newsletters for just $6. http://www.247lowcarbdiner.com/html/newsletter.html
Here are a few other things in this issue to tempt you.
Now to get to that tree...maybe.
Get more great recipes at the Low Carbing Among Friends Facebook Page: https://www.facebook.com/LowCarbingAmongFriends
Order any of our great cookbooks at http://amongfriends.us/24-7-LCD.php
Proceeds from my book sales go entirely to support my educational program. Your purchase makes a difference to the teens I teach.
Sunday, November 24, 2013
Cozy Cranberry Sippers
OOh baby it's cold outside--at least at my house. I just can't get warm! All layered up and everything, but I am just chilled to the bone. Last night I made Punkin Chili, and that didn't do the trick. Today I resorted to a hot drink. This cranberry tea is so delicious and that warm cup did wonders for my hands. This is easy to put together. I just robbed a few fresh cranberries from the bag I intend to use for our Thanksgiving Cranberry Sauce Three Ways. (I always make three variations so we don't get tired of the same thing) I doubt we will miss those ten berries. I do plan on buying an additional bag to keep in the freezer this year. Cranberries disappear after the holiday season around here.
This tea is fruity sweet and spicy--all the great flavors of the holidays. I used a Christmas flavored herbal tea, but any tea will work well, I think. If you use an orange flavored tea, you might be able to skip the addition of the kool-aid powder. Definitely worth some experimentation. Just don't miss the cloves. That's the flavor that really makes the drink special. If you don't have a spiced tea you might want to add a pinch of pumpkin pie spice when you add the teabag.
Cozy Cranberry Sippers ( for 2)
2 1/2 cups water
10 fresh cranberries
2 teabags, regular, spice or orange flavor
2 pinches unsweetened orange flavored drink mix
4 packets stevia or other sweetener (most packets equal 2 tsp sugar)
1/8 tsp ground cloves
Bring water and cranberries to a boil in a small saucepan. Add the tea bags and let the mixture sit for 5 minutes until cooled enough to transfer into a blender. Discard the tea bags and process until the berries are blended in. Pour the tea mixture through a strainer back into the sauce pan. Stir in the orange powder and sweetener. Heat to desired temperature. Adjust sweetness to taste.
I love that this recipe doesn't use any artificial sweeteners. I have an easy version of a hot cranberry drink too. Cranberry Hot Drink is a favorite from years past, but this tea and real berry version is a little different and is worth the trouble.
This is such a pretty drink. It will be a beautiful choice for sipping throughout the holidays. The 24/7 Diner News December edition will feature a whole page on warm winter drinks for enjoying when the weather is cold. If you have a favorite low carb fireside sipper, I would love to include some of your recipes in the Diner News.
Sunday, November 17, 2013
Italian Sausage Soup with Gnocchi
Life is crazy busy for me. Crazy. I am hosting a formal fundraising banquet for our educational program this week. All that organization is tough enough without the added stress of doing so many of the jobs ourselves to save money. We have printed and bound our own masterplans, done all the promotional materials, met with the hotel, hand addressed all the invitations, made our own video...the list goes on! Because life is too much right now to think much about food at all, I have not been very creative in the kitchen. For prep day, I made a bid pot of soup to eat several times this week. It is very flavorful, and with the addition of low carb gnocchi, it is filling too.
I have been wanting to try something new with my gnocchi recipe that is in LCAF I. This time, I added a teaspoon of glucomannan powder, hoping for a bit of binding. It may have made them a little chewier and more like the potato variety, but not too different from the original. If you have glucomannan, give it a try, If not, it is certainly not necessary. The dough does hold together well in the boiling water though. The little pillows did not fall apart in the broth of the soup either ( though I did add them in at the end to make sure.)
They impart a nice cheesy, garlic flavor to the soup and just generally make a simple vegetable soup more fun.
I am packing the soup into canning jars for work. I think I will keep the gnocchi separate in a little baggie. I love to take soups to school for lunch. That way when the kids come in with chili dogs and onion rings, I at least have something more substantial than a salad. I took vegetable beef soup last week and actually had a student offer to trade me lunches. We will see what happens this week! To change things up, I may add a one ounce block of cream cheese to make it a cheesier version later this week.
Italian Sausage Soup with Gnocchi
Soup:
1 lb Italian style pork sausage
1 onion
1 yellow bell pepper
1 green bell pepper
2 zucchini, cut in slices, then quartered
2 tsp minced garlic
14.5 oz can diced tomatoes
29 oz water
1 quart beef broth
1 tbsp Italian seasoning or Mediterranean seasoning
1 tsp salt (adjust if using salty broth)
Gnocchi:
3 eggs
1 tsp glucomannan (optional)
1/4 cup Parmesan cheese (canned, dried) plus a bit for garnish
1/4 cup coconut flour
2 tsp minced garlic
1/2 tsp salt
In a soup pot or Dutch oven, brown the sausage with the onion and peppers. When no pink remains in the sausage, add zucchini and garlic. Saute 5 minutes. Pour off excessive fat if any. Add the diced tomatoes, water (2 tomato cans full) broth, seasoning and salt. Simmer for 30 minutes while preparing the gnocchi.
In a medium bowl, beat eggs lightly. While whisking, slowly add in glucomannan powder, if using. Stir in Parmesan, coconut flour, garlic and salt. Place the dough between two pieces of plastic wrap. Form the dough into a rope shape about 1/2 inch wide. Chill for 30 minutes or place into the freezer for 10. Bring a medium pot of water to a rolling boil. Slice the dough into bite sized pieces (they will expand in the water) drop them one at a time into the boiling water. They will initially sink, then rise to the surface. Stir gently to keep the gnocchi separate. Cook for 3-4 minutes then remove with a slotted spoon. It may take 3-4 batches depending on the size of pan used. I keep gnocchi in a single layer to prevent sticking. If not using immediately in the soup, let them dry out for about 30 minutes before packing them for storage.
You don't have to make the soup to make the gnocchi of course. They are marvelous with marinara sauce too. They are more tender than traditional potato filled gnocchi, but a nice change from zucchini or cabbage noodles for us low carbers. I made mine with the fabulous Mediterranean seasoning from Target's Archer Farms. Love that stuff and I only have to grab one bottle from the spice rack! A few shakes of crushed red pepper would be great too.
Now here's to surviving this crazy week. Wish me luck. Our program really needs to find supporters if we are to keep the doors open! Bet most of you couldn't attend the banquet, but do remember that all my book sales money goes to keep the doors open for the kids, so think Christmas presents! Just click on the link of the LCAF books on the right. I am in I, II and V. V is a pre-order that will ship at Thanksgiving. If we get all the school's bills covered, and eventually even get salaries, I will have more time to spend in the kitchen. I am so ready to hand over my fundraiser hat so I can concentrate on kids and cooking. The kids are worth it though!
Saturday, November 9, 2013
Albuquerque Turkey White Chili
The weather around is really beginning to call to me to make chili. I have all sorts of recipes. We have enjoyed a white chili recipe since our low fat days back in the nineties. No white beans now, however. In the mood for that recipe, I set out this morning to mimic those flavors. No, I didn't have any chicken thawed. Turkey. Yes. That will do. (Often, this is the way I come up with new recipes--just by using what I have when the creative juices flow) That old recipe called for simmering the chicken in broth with cumin seed. I had that, so off I went!
Gotta say, this might be better than the original, although it didn't turn out to similar at all. Not really like a chili, more like a soup. Back in those days, I never had green chili powder. Now I am never without it. It has so much amazing flavor and is so easy to use. Not easy to find--I order mine online--but it is worth it. If you don't have time to wait, just throw in an extra small cans of green chiles. (I never even have those around, since I buy #10 size cans and divide them up into ice cube trays and freeze.) In fact, this is probably more similar to my Albuquerque Cream of Chicken Soup that is in Low Carbing Among Friends Volume I. This has more veggies though and is much chunkier, so it is a bit more like a chili. Both good but no need for pre-cooked chicken here. In fact, I started with a frozen roll of turkey. This definitely qualifies for an E.Z. Fix meal. Plus, how fun is it to say "Albuquerque Turkey?"
Albuquerque Turkey White Chili
1 lb ground turkey
1 qt turkey broth (may substitute chicken)
1 tsp cumin seed (comino)
1/4 medium yellow onion
1 yellow bell pepper
1 green bell pepper
1 zucchini
1 tbsp mild oil
4 oz diced green chile peppers
1 tbsp lime juice
1 tsp minced garlic
1 tsp green chili powder (optional)
1/2 tsp onion powder
1/2 tsp sea salt
3 oz cream cheese
1/2 cup half and half
Place turkey into a soup pot or Dutch oven.Cover with broth and add comino seeds. Cover and simmer for 30 minutes. While that is cooking, dice the onion, peppers and zucchini. Heat oil in a large skillet. Saute the vegetables until onions are transparent. Remove from heat.
When simmering time is up, use a potato masher to break turkey into crumbles. (if you started with frozen turkey, the very center may still be uncooked. Don't worry, it will finish cooking in the remaining simmering time.) Add the sauteed vegetables, chiles, lime juice, garlic, chili powder and salt. Simmer for 15 minutes more. Cut the cream cheese into cubes and add it to the soup pot. Let the soup stand, covered but without heat, for 5 minutes. Stir the melted cream cheese into the soup. Stir in the half and half. Adjust salt to taste.
Serves 6 -- 263 calories 17 g fat 21 g protein 6.6 carbs
This is delish. Even my hubby who does not like spicy foods liked it. If you want more heat, add some cayenne or red pepper flakes. I buy my Hatch green chili powder online--it is so worth the effort. One order will last for years.
Get more great recipes at the Low Carbing Among Friends Facebook Page: https://www.facebook.com/LowCarbingAmongFriends
Order our books at:
Love the recipes I share on this blog? My ebook helps you plan and prep to stay healthy 24/7. http://www.247lowcarbdiner.com
Saturday, November 2, 2013
Pumpkin Fudge Mini Doughnuts
I made a delicious pumpkin chocolate chip cake a few years ago for a recipe contest featuring pumpkins. I didn't win, but i did fall in love with the flavor combination! In fact, this post is all about a combination that works. I made these Pumpkin Coconut Mini Doughnuts in October for the Diner News. I opted to add the cocoa nibs and they were very nice. I popped a few into the freezer to save for later. This is later. It sure pays to stock the freezer!
For the November News, I found this recipe from Chocolate Covered Katie. The concept fascinated me. A no bake chocolate pumpkin pie filling. I had to try it out, even if it was too late to get photographs in the News. It is very interesting. My version was much darker than Katie's photos. I think perhaps she used milk chocolate chips and mine were darker. I used a combo of sugarfree chocolate chips and regular semi sweet. I know my fudgy version has too many carbs, but it was an experiment, and the serving size is pretty small. (I get tummy trouble from maltitol and didn't have any better chips on hand) I plan to try it again using unsweetened chocolate and my own sweeteners. If you are inspired, you might beat me to that, so let me know if it works. Since I tried it without an actual pie crust made, I still have some of the mixture in the fridge. From the very start, I thought it would make a terrific, stable frosting that didn't rely too much on butter or cream cheese. That it does! I love it as a dense frosting. You may want to half the recipe if you are just using it as a frosting, though. Haven't figured the carbs. Hoping to get a new version of a recipe/nutritional program for my birthday. Missing my Mastercook since my laptop was stolen. Yes, that is still smarting.
To me, the chocolate is stronger than the pumpkin in the frosting/filling. But paired with the pumpkin doughnuts, the combo is absolutely perfect. Try it on a pumpkin muffin to make it more like a cupcake. Use it as a filling for a Ginger Cakes. Heck, it would be very tasty spread on an Almond Thin.
This is the recipe for the doughnuts. I like the mini ones made in my doughnut appliance. They are so cheap, go ahead and buy one. Much better than the pan I bought.
Pumpkin Coconut Doughnuts
5 eggs
1 cup of canned pumpkin puree
¼ cup coconut oil , melted
¼ tsp stevia or sweetener equivalent to ¼ cup
1 tsp vanilla
½ cup coconut flour
¼ cup finely shredded coconut
1 tbsp pumpkin pie spice
1/2 tsp baking soda
Powdered sweetener (Swerve)
Break eggs into a medium bowl. Whisk well. Stir in the pumpkin, coconut oil, stevia and vanilla. If the coconut oil solidifies, warm the mixture in the microwave for 20-30 seconds. Add coconut flour slowly, stirring well to incorporate. Add in the coconut, spice blend and soda.
Place the batter in a doughnut appliance or oiled mini doughnut pan. Bake 4 minutes in the appliance or 15 –20 minutes in a 325 degree oven. Dust with powdered sweetener before serving.
Options:
· Add 2 tbsp cocoa nibs to the batter.
· Instead of powdered sweetener, brush with butter and coat with a mixture of cinnamon and granulated
sweetener
Pumpkin Fudge Doughnut Frosting (a.k.a. Pie Filling)
1 cup sugarfree chocolate chips
15 oz pumpkin puree
2 tsp cocoa powder
1 1/2 tsp vanilla
1-2 packets stevia
1/8 tsp salt
Over low heat, melt chocolate chips. In a medium bowl, combine melted chocolate, pumpkin puree, cocoa powder, vanilla, stevia and salt. Combine all the ingredients and adjust for sweetness. Chill, then spoon onto doughnuts or muffins. Smooth with the back of a spoon. (or your fingers) Use a clean pen to create the hole in the frosting, or just leave it capped.
These have wonderful texture. The thick rich frosting paired with the cakey doughnut is delightful and rich. They feel like a cheat. Now, remember, both of these recipes were featured in the 24/7 Low Carb Diner News. See what you are missing if you don't subscribe? Just 6 bucks a year. Each issue is generally 8 pages of recipes and tips you can use. Order here.
So glad I got to show of my latest find from the thrift store. Isn't this little pedestal serving plate too cute? Good score for $1.50. Somehow a pedestal makes everything more special--even if it did come from the freezer!
Wednesday, October 23, 2013
Roasted Purple Kale and Kabocha Salad
Thanksgiving is not too far away. You making plans for something new, or planning on the old favorites? Admittedly, this is an American holiday, so those of you from other parts of the world are a little left out--but hey, why not take advantage of our frenzy to make the most delicious meal of the year? What could that hurt? My Diner news this month is the annual Thanksgiving issue--mostly specializing on extra special side dishes. This is one that will be featured.
Not only is it beautiful--it is really healthy too. It is loaded with things I love. The super sweet roasted Kabocha squash...gorgeous purple (officially red) kale, bacon, pecans and a touch of cheese. Oh yeah! And the textures-- if you never tried kabocha, its creaminess may surprise you. Contrast that with the crisped kale and salty bacon. This one is topped with a bacon vinaigrette and a touch of Parmesan. It would be a perfect salad for the Thanksgiving table.
Roasted Purple Kale and Kabocha Salad
1/2 Kabocha squash (reserve other half for another recipe)
2 tbsp olive oil
5 strips bacon
1 bunch purple kale
1 tbsp red wine vinegar
4 drops stevia or sweetener equal to 4 tsp sugar
1 tbsp toasted, chopped pecans
1 tbsp grated Parmesan
salt and pepper to taste
Preheat the oven to 400 degrees. Wash kabocha squash, but do not peel it. Cut it into wedges about 1 inch at the thickest part. Place on a baking sheet and drizzle with olive oil. Toss gently to coat. Roast for 30-40 minutes until soft and browned on the edges. Set aside half of the slices. When cool, cut the slices into bite sized chunks.
In a large skillet, fry bacon slices until crisp. Set the bacon aside, reserving the fat in the skillet. Wash kale and remove tough stems. Dip each leaf into the bacon fat and place on a cookie sheet. Sprinkle with a bit of sea salt. Bake at 400 for 8-10 minutes. Remove and cool.
Make a simple vinaigrette from the remaining bacon grease in the skillet. Stir in the vinegar, and stevia.
To assemble salad, use kitchen shears to cut kale leaves into bite size pieces. Place the kale on a serving platter. Top with kabocha chunks. Spoon the bacon vinaigrette over the salad. Top with pecans, Parmesan, salt and pepper.
Serves 4: 193 calories 5 net g carb
The thing I love about kale salads is their durability. This salad is not going to wilt even with the dressing. The caramelized squash tastes great at any temperature and the combination of flavors is delightful. Don't think you have to save this for the holiday, though. Just add a little protein, and you have a great dinner. It can be served as a warm salad also.
Get more great recipes at the Low Carbing Among Friends Facebook Page: https://www.facebook.com/LowCarbingAmongFriends
Order any of our great cookbooks at http://amongfriends.us/24-7-LCD.php
Sunday, October 13, 2013
Pumpkin Coconut Fudge and Home Made Coconut Butter
I have always wanted to make a fudge type treat for my school lunches. I love coconut oil candies, but they are a little unreliable in a lunch box. A little heat and you have a mess on your hands. I know a lot of you use coconut butter to add some stability, but I was too cheap to experiment. Then I started noticing lots of recipes for making your own coconut butter. Still, I wasn't sure if my Ninja could handle the time it takes to get that job done. Yes, you do have to run your machine quite a while to turn unsweetened coconut flakes into coconut butter. Except those of you who can brag about your Vitamix. I don't have one of those and so far Santa has not left one under the tree for me. I might try again this year.
In the meantime, I was out shopping at Big Lots last weekend, armed with my 20% off coupon. I saw a factory reconditioned food processor all alone on one bottom shelf. I left without it. Afterall, I need a kitchen remodel to hold all my appliances, despite the fact that I have a tiny kitchen with almost no storage. This Black and Decker model is hefty. I told my guys about it and they both agreed that I should use my coupon and a gift card to go get it. Yes, Pearson was willing to let the coffee area become even more crowded. What a sweet guy. I began to have visions of more mayo, nut butters and coleslaw. Yes, I recently killed yet another immersion blender--my standby for home made mayo.
My first project was to make the coconut butter. I figured if it burned out the food processor, I still had the chance to take it back to the store. It took awhile, but it did magically turn my dry coconut shreds into a fine coconut butter. At least I think it is fine--I have never actually tasted commercial varieties.I think home made might be a touch more gritty than the store bought variety. The photo below was taken before it completely cooled. It was still a little liquidy. After a few hours at room temperature, it became solid. In fact, in a cool kitchen after a week, it needs to be heated just a bit to be spoonable. A few minutes in a bowl of hot water ought to do the trick--or a quick trip to the microwave oven.
The recipe is too easy, it is hardly a recipe at all. I simple processed 8 ounces of unsweetened shredded coconut with 1 tbsp coconut oil and a pinch of salt. I processed mine for about 20 minutes, stopping to scrape down the sides about 4 times. I honestly don't think mine changed much the last 5 minutes. This is going to be one of those processes that has some wiggle room. I think the moisture content of the coconut you use will make a difference in the amount of time needed to process. Just be sure not to use fresh coconut, and not the type that says desiccated. I think that would be too dry. Either shredded or flaked should work, and of course, no sugar.Mine made about a cup of butter. Maybe a bit more. I honestly didn't measure, I just poured it into a jar.
With that made, I set to work on a wonderful fall themed fudge. Fudge may be a misnomer, because there is no chocolate here. I have wanted to make something like this for several years. I tasted one once with sweetened condensed milk and vanilla chips. Both of those are tricky to substitute. This fudge is not quite the same, with the unmistakable flavor of the coconut, but it is delicious. It is rich, and held up just fine in my lunch bag.
Pumpkin Coconut Fudge
1/2 cup coconut butter
1/3 cup pumpkin puree
2 tbsp coconut oil
1 tsp pumpkin pie spice
1/4 tsp vanilla
1/4 tsp liquid stevia, or any sweetener equal to 1/4 cup sugar
1/8 tsp salt
3 tbsp toasted chopped pecans, optional
Warm coconut butter if not spoonable. In a medium bowl, combine coconut butter, pumpkin puree, coconut oil, spice, vanilla, stevia and salt. Spoon mixture into a sprayed or plastic wrap lined loaf pan. Smooth the mixture on top. If using pecans, press them into the top of the fudge. Chill for 30 minutes to firm up. Slice into 15 squares.
1 piece is 87 calories 1 net g carb
This stuff is so yummy. Add a little more of the pumpkin pie spice if you want. The toasted pecans pressing into the top are very nice too. They add to the texture. I made some with and some without because my Pearson is a nut hater. I know. He is weird like that. Not allergic, just not a fan. He loves his pumpkin pie, though, so this works for him. I am not sure on the carb count of the coconut butter. If I go by the brand that I used these would have 3 1/2 carbsper serving for the coconut butter alone. But nutrition info is all over the place--for other brands, Bob's Red Mill lists 2 net carbs for the same amount by weight. Commercial brands of coconut butter seem to list more fiber, so the net also ends up at 2 g for a 2 tbsp serving, I would think that is closer, but feel free to do your own math. I still don't have a nutrition program since my computer was stolen. Since we don't count daily, it is not our priority. Sorry for those of you who are more strict about that. Only so many hours in a day.
So now back to prep day for me. Today I am doing some Green Chile Chicken Shreds, a Breakfast Bonanza casserole and Hazelnut Pumpkin Custard. Some day I will get tired of the pumpkin flavored goodies, but today is not that day!