companion blog to the e-book the 24/7 Low Carb Diner

Companion blog to the e-book
Available at http://www.247lowcarbdiner.com

Sunday, September 16, 2012

How To Dress a Fish

Normally, I am not a huge fan of fish. Probably comes from living land locked. I would never really "dress" one, as in grab the fillet knife and cut away. I can't even buy something that is staring at me. I have learned to eat Tilapia. These fillets don't taste quite as fishy to me, and they are super easy to prepare and reasonably priced. I love that I can keep some individually wrapped fillets in the freezer.  These can be popped into the oven, still frozen. With just a few veggies and some flavorings I have a nice meal that bakes while I make a side dish or dessert.

This week, I took that idea and decided to employ the same strategy at work. With our school housed in an old house, actually an old orphanage, we have a huge kitchen. Why not take advantage of that? So today, I grabbed a bag of tilapia and raided the spice cabinet. I have now packaged five different lunches, all wrapped in foil packets and ready to pop into the toaster oven at school. If I let the fish thaw all morning, it will bake up in about 20 minutes. I can just pop it in, do some more work, then enjoy lunch with everyone else. Easy Peasy hot lunch. And because they are all different flavors, no boredom. Not that I was planning to eat fish everyday at lunch. I will spread these out over the next five weeks. If you can't cook for lunch, these are great weeknight meals too.

Amazingly easy to pack in the morning too. I will just grab some sesame crackers and maybe a flavored yogurt and lunch is packed. No excuses. Here is what I came up with. I just used the veggies I had on hand.  Feel free  to add in what appeals to you. I also drained a can of fire roasted tomatoes to add in. Love that flavor.


Tilapia Foil Packets

1. Chop vegetables and gather spice blends.
Line a small cookie sheet with foil. I press down the foil to catch any spills from the flavorings.
2. Place a fish fillet in the center. Sprinkle with seasonings and add veggies. Drizzle with oil if using.
3. Fold the foil up on the top and bottom along the short edge. Bring the long edges together to meet in the center. Fold these sides together, creating a seal. You will repeat this procedure with each fillet.
4. Use a permanent marker to write the flavoring directly on the foil.
5. Place all foil packets inside a gallon size bag (or the outer bag from the fish)
6. Place foil packet on a rimmed cookie sheet. Bake at 350 for 15-25 minutes depending on size of fillet and degree of thawing. Fish should flake at the thickest point when done.


Tilapia Creole (pictured at the top of the post)
Sprinkle with Creole Seasoning. Surround with vegetables (I used green bell pepper, onion and fire roasted tomatoes) and drizzle with olive oil. Seal.
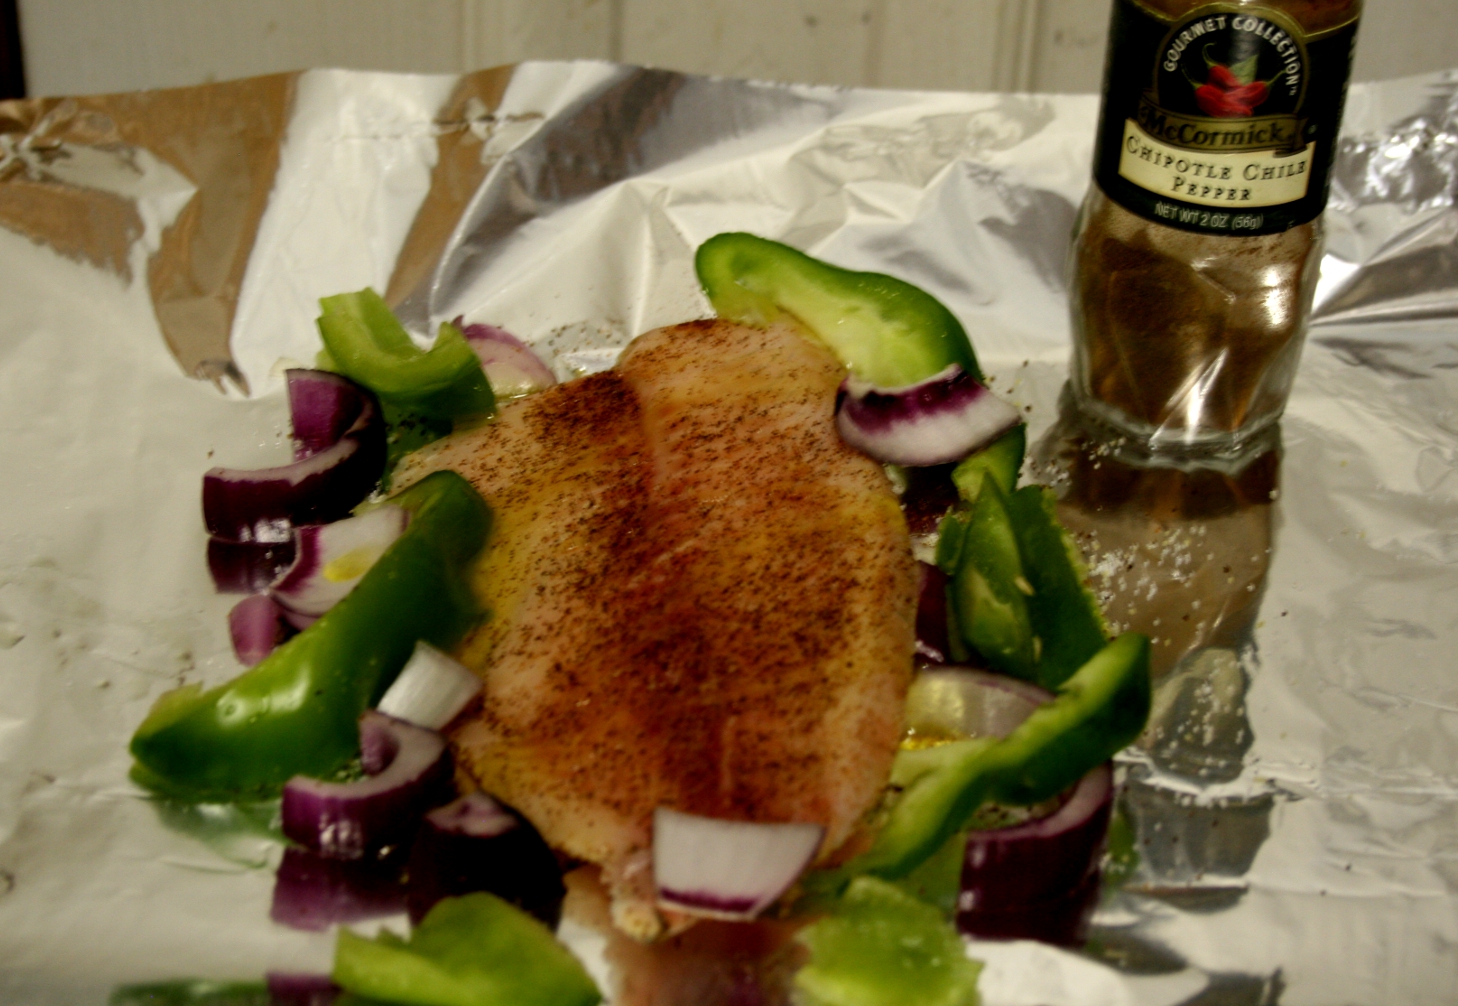

Chipotle Lime Tilapia
Sprinkle fish with one packet of True Lime and with chipotle chili powder to taste. Add a sprinkle of salt and a drizzle of olive oil. For a fajita like meal, use onions and peppers for the vegetables.


Smokey Joe's Tilapia
Sprinkle fish with Hickory Salt and onion powder. Add a bit of olive oil. Fire roasted tomatoes and onion complete the outdoorsy taste.


Persian Lime Tilapia
The star of this one is some amazing flavored olive oil. The oil itself is infused with lime flavor. That makes a dish like this incredibly easy to prep. Just a drizzle with a good dose of garlic powder and a sprinkle of salt. To this, I added zucchini, with a tiny bit of onion, bell pepper and some fire roasted tomatoes.


Chinese 5 Spice Tilapia
Change up the usual flavor with some 5 Spice Blend. The anise in this is so unusual! Just sprinkle a little of the spice on--just a bit because the flavor can easily overwhelm. I also added some garlic and some soy sauce. The veggies are celery and zucchini. (I would think there are others that would be good too)

This takes so little time, it is embarassing. But maybe, you had never thought of it. Every little step you can take in early prep means being more successful on your eating plan. Now on to the rest of my prep day. Have a great week!


Wednesday, September 12, 2012

Guajillo Beef

Still loving my guajillo chile powder I ordered online. That has been a while, but it is still full of flavor. Unusual, not your grocery store variety.  This recipe would work with the standard stuff, but guajillo takes it up a notch.

The great thing about this recipe, which is a cousin to my Southwestern Beef, is that it can go in the crockpot, cook for just aw hours, then get used as a Triple Play Meal for all sorts of things! To make it extra easy and quicker to cook, I used Carne Picada. Instead of cooking a whole roast then shredding, the meat is pretty much shredded going in. (remember my issues with cutting raw meat--love that this is done for me)

The other thing that adds a depth of flavor to this dish, is that it is braised in coffee. Make a little more than you usually drink in the morning, and use it to add to the beef. Mmm. Even though my husband does not like hot and spicy and disdains coffee, I still think he would like it. I planned it, though for those of us in the house who appreciate the heat. John got a new chicken salad recipe, which he though was a casserole in his lunch. Oblivious to the salad concept, he nuked it at work. Oops. He still ate it. What a guy. I wonder what that tasted like? I am featuring that recipe later this week. My taste of it was delish. I will recommend it be served cold, however.

The beef is spicy and full of flavor. I left out the cheese and didn't even miss it.

Guajillo Beef

1 1/2 to 2 lbs Carne Picada (or stew meat)
3 tbsp Guajillo chile powder
1 tsp liquid smoke
1/2 tsp garlic salt
1/2 tsp onion powder
1/4 tsp cinnamon
1/4 tsp Mexican oregano
3/4 cup brewed coffee

Place beef in the crockpot. Sprinkle the spices over the meat. Pour in the coffee. Cook on high for 3 hours. Drain all but a few tablespoons of liquid. Stir the cooked beef to distribute flavors. Divide into meal sized servings. Possible uses: salads, filling for mini peppers, in lettuce leaves, with scrambled eggs, in quiches, as filling for crepes or in low carb tortillas.

I love mini bell peppers. They are fun to fill with all sorts of delicious stuff! Eating this at work will make everyone who has a sandwich jealous. I took my photo catching up on some work at my desk. Not the best lighting, but life as it really is.

Get more great recipes at the Low Carbing Among Friends Facebook Page:               https://www.facebook.com/LowCarbingAmongFriends

 Order any of our great cookbooks at  http://amongfriends.us/24-7-LCD.php

Order my original e-book or the latest version for couples and singles,  A Table for Two here

Sunday, September 9, 2012

Spoon Salad and Cauli-rice Cups to Go


Cauliflower. You could consider it boring. I mean, it really doesn't taste that amazing. Kinda bland on its own. Growing up, my mom could only get us to eat it one way--with cheese sauce. Good news is that cauliflower adapts so well to all sorts of flavors. You already know the drill. We low carbers mash it to replace mashed potatoes. We boil it for "tater" salad. We roast it to replace popcorn. We bake it into desserts. We even cut it up really fine to replace rice. That is one of the things I did today with a fresh head of cauliflower. But I do it a little differently sometimes. Alright I am lazy.  I admit it.

My sons refuse typical cauli-rice. Just not their thing. Well, one son actually calls cauliflower "nature's snot." Guess I overcooked it for him on some occasion. A whole head is a bit much just for the hubster and I, and ricing it is a mess. So here's what I opted for today, and I think it is working out fine.

I had planned to put a Spoon Salad on the menu this week. That requires finely chopped cauliflower. I do that in my Ninja. Even a girl trying to eat more salads can only eat so much, though. So the rest, I packed into little silicon muffin cups and froze. These are going to be great for work lunches. They reheat in the microwave and can still be doctored up to go with so many things we may be packing for lunch. So which first? The spoon salad or the Cauli-rice cups?

The Spoon Salad is nothing new. I have had the recipe in my Diner News before. The idea is to chop sturdy vegetables really, really finely. Make sure to chop things that don't have too high a water content or spoil too quickly. You can add those in just before you dine if you like.

Start with hard veggies. I like mostly cauliflower and cabbage here, but a bit of carrot or jicama is good too. Process those together in a food processor. I use my Ninja. Maybe not quite as good, but it does the work. Don't try it in a blender.

Next choose some medium textured veggies. I like all colors of peppers and a little red onion for flavor and color. I have heard of using zucchini, but it can get a little watery. Process them until finely minced. Stir them in with the hard veggies.

Next, I do the softer, leafy greens. I like kale the most, but you can also use spinach, like I did today. Add in some fresh herbs. My choice today was rosemary and chives. Mint is good, basil is wonderful. I also like Lemon Balm. Process those and remember to pulse to avoid turning them into mush. Add those in with the hard veggies, and stir well. Store the salad in a covered container. I like wide mouth jars. Don't add dressing yet.

When lunch time rolls around, spoon some salad on your plate and drizzle with your favorite dressing. I like vinaigrettes here with a bit of feta cheese sprinkled on top. Sometimes I add a pinch of chia seeds for extra nutrition. Don't put those in the day you make it or you will get sprouts. These salads should stay good for the work week as long as your ingredients were fresh. The proportions are up to you. Again, method not recipe.

Now with that extra minced cauliflower I had. This is a little finer than I make with my usual cauli-rice. I like it that way so that it gets more tender with very little cooking. For today, I pre-cooked it in the microwave for three minutes, along with some diced bell peppers. I was going for the confetti rice look. Partially cooking keeps the cauliflower from totally becoming mush in its upcoming meal, when it will finish cooking when I warm the dish.  Stir in some sea salt to taste, or add in some tamari.


I scooped this mixture into silicon muffin cups and froze them. These are going into a gallon bag. Then, I can easily add them to lunches when I have leftover sauces from dinners. This week they are matched with chicken curry. They will also be great to eat with teriyaki steak, fajita chicken bites, basically anything we would typically like rice with. If you don't have a sauce, you could even just thaw and eat these with some salad dressing.


So nothing too fancy here. Just a couple of Diner style time savers. I only have to clean the food processor once, and several meals have a side dish covered. That is how I do it.

Friday, September 7, 2012

Baba Ganoush a la My Students

On Fridays at our "school" we have an international cooking club. Today I talked the Element kids into making baba ganoush.  They loved saying it, but after seeing the eggplant, they were not so sure! Let's get the academics out of the way, since we are talking school here. Yes, there are different ways of spelling it. I am personally not that fond of silent H, so I chose the simpler version. Spelling should not be so complicated. In addition, different countries claim their own version. Let's just say we settled with Middle Eastern. We could get into a lesson about the Levant, but this was cooking not ancient history class.

In the photo, you will see real bread. Ignore that. The school kids are not low carbing. The dip is, so that's okay. Actually, since the start of school, they have also made a cheese souffle and cheese fondue. Both low carb. Can you guess who the teacher is?

Also, we made our tahini from scratch. What was easy for me at home turned into an interesting experience. Transferring sesame seeds into a blender is not such an easy task--even for two people. Maybe especially for two people. I am not sure.. Let's just say we will be finding sesame seeds every time we sweep or even open kitchen drawers for awhile.

This kitchen fun had to fit in between my Blogging as Composition class, Secrets of Mental Math and Improv  Theater. See how much fun we have?

I loosely followed several online recipes, including one from the Pioneer Woman. She lives in my neck of the woods. Don't actually know her, but we do travel in some of the same education circles. Friends of friends kinda thing. I guess cooking blogs are a dime a dozen. OK. Hers is more like a hundred grand...Sometimes I envy not having to make all my selections low carb and healthy. Oh well, I love my little blog too, and she is way funnier than me. But I digress...

Back to that fun to pronounce baba stuff. We are still under a burn ban here, so absolutely no grilling the eggplant outdoors. That is what I would do if I could and it was not still 104 degrees. The trick is to blacken the skin. Because we had to do ours inside, on a yucky electric coil to boot, we also had to bake in the oven. You can do it all in the oven, you just won't get the layer of the blackened taste. Maybe you won't get the smoke we got either. We had to bake our tough little eggplant for 35 minutes. Do a little prep, go take a class. Works for an alternative program like ours. No bells.

Now the part that really had the kids worried. I informed them that once roasted and skinned, the eggplant would like like the pregnant starfish I dissected in high school. My son Christian thought it looked more like squid. Don't ask me about the time we tried to dissect those. I must be cursed when it comes to teaching biology. I have more horror stories than you would care to know. I digress again.

I must admit that once the squeamish among them got that look in their eyes, I decided to hide that part from them. Want to see what it looked like?  Head over and take a look on Ree's blog. Lovely. I peeled the eggplant and scooped that stuff into the blender before I called them back from their reading. Whoo. That worked.

The teens added all the rest. Everyone who tasted it rather liked it. Maybe not a meal for the gods, but we liked it. Personally for me, I would have upped the lemon a bit. Some thought it needed pepper. I think this is one of those recipes you can up the ingredients to your own personal taste. I had already added more than Ree, so I assumed ours would be extra flavorful. Not overpowering at all, so do what you want!

Baba Ganoush ala Element

1 medium eggplant
1/4 cup tahini
3 tbsp olive oil (divided)
3 tbsp lemon juice
2 tsp minced garlic
1 tsp cumin
1/2 tsp salt
1/4 tsp ground coriander
1/4 cup fresh parsley, optional

Blacken the eggplant over a grill or burner. Bake until soft inside, 30-45 minutes. Peel the eggplant and place the insides into a blender. Add tahini and 2 tbsp of the olive oil. Blend. Add in lemon juice, garlic and spices. Blend again.  Pour from the blender onto a plate. Pour remaining olive oil over the mixture. Garnish with fresh parsley and an additional sprinkle of sesame seeds. Chill or let rest an hour to allow flavors to blend.

We served ours with baked pizza crust, but for low carbers, add some traditional olives. I think jicama chips and cucumber slices would be good too. Joseph's Lavash bread is a great choice if you don't need to be gluten free.

Wednesday, September 5, 2012

Happy Harvest Waffle Sticks

So it is going to be 100 degrees here today. 104 yesterday, but my bank said 109. Ugh. So tired of oppressive heat. I couldn't help myself. I had to start testing new pumpkin recipes just to will autumn to arrive in my little corner of the world. Don't know that it helped, but I donned my pumpkin colored t-shirt and headed to the kitchen anyway! Wednesdays are the day at our school when we send the kids out to work in the community. I don't have to be there and they are off doing internships, apprenticeships, part time jobs or volunteer work. Good plan! That means I get to head into the kitchen.

This recipe can be made two ways. My first idea was waffle sticks. Then I accidentally plugged in the cupcake ball maker instead. I tried those too. Both work fine. I made a sweet batter because I was looking for something less like a waffle and more like a portable breakfast or lunch snack. Who wants to mess with syrup? These do taste like fall!

We just got a new health food store in town. I was happy to see that they are carrying golden flax seed. Those have a milder flavor than the dark seeds. I ground mine up fresh for this recipe. Worked great and makes them less expensive over pure almond flour too.

Happy Harvest Waffle Sticks

3/4 cup almond flour
1/4 cup golden flax meal
1/3 cup granulated Swerve (or equivalent sweetener)
1 1/2 tsp pumpkin pie spice 
3 eggs
1/4 cup pumpkin puree
2 tbsp coconut oil

In a medium bowl, mix almond flour, flax meal, sweetener (if using dry, if not add it with the wet ingredients),
1/2 tsp baking powder, and spices. To that bowl, add eggs, pumpkin and coconut oil. Stir until blended. The mixture will be thick.

Spread the batter onto a hot waffle iron or into a cake ball machine. Because the batter is dense, you will need to spread it to the edges or mound the batter in the cake ball machine. Close the lid and cook until the steaming stops. For an extra crunchy waffle, add an additional 2 minutes past normal baking time.

Serves 4:  288 calories  4 net g carb


These taste like fall! Like I said before, you can add a little waffle syrup if you want, but you don't need it.  I am packing these for snacks at work for us. No sticky syrup and no hot oven required of muffins or cookies. Now I am going to hang out in front of the air conditioner and imagine it really is a cool fall breeze.

Get more great recipes at the Low Carbing Among Friends Facebook Page:               https://www.facebook.com/LowCarbingAmongFriends

 Order any of our great cookbooks at  http://amongfriends.us/24-7-LCD.php


Order my original e-book or the latest version for couples and singles,  A Table for Two here.


Saturday, September 1, 2012

Croque Madame Cups

When I travelled in Europe as a teen, I fell in love with the street vendor food, Croque Monsieur. Those are really ham and cheese sandwiches, grilled. The ones I ate had the cheese melted on top. To make it a Madame version, the fried egg was added. I was never a huge fan of the feminine version. Til now.

I made the amazing little cups as a recipe for the Diner News. I like them so much that I can't help but share this recipe with all the blog followers too. The newsletter is also filled with plans to make lunches ahead of time for smooth stressfree brown bagging during the week. Still lots of good info and ideas there.


Croque Madame Cups
6 eggs, divided whites and yolks
1/2 cup unflavored whey protein
4 oz cream cheese, softened
4-6 oz thinly sliced ham
2 tsp Dijon mustard
1/2 cup soft cheese, Gruyere or another

Begin by making some “bread” to stand in for the bread in the traditional sandwich. Beat egg whites until very stiff. Gently stir in the whey powder and the cream cheese. Make three small loaves shaped like sub buns by mounding the mixture on a non stick silpat liner or parchment paper. Bake at 350 for about 20 minutes, Remove the buns and set two aside. You may use these for sandwiches for another lunch. Cut one bun into strips and return the strips to the oven for an additional 5 minutes. This will make them extra crispy. When cool enough to handle, cut the strips into small cubes.

Using two shaved ham slices, line 6 muffin cups with the ham. You may use papers if you choose. Divide the cheese among the cups. Place 2-4 bread cubes in each cup. With a spoon, drop an egg yolk into each cup. You may keep them whole or break the yolk to help fill the fold in the ham slice. Bake for 15 minutes or until egg is just set. Top with a squirt of Dijon mustard.

Eat right away or wrap with plastic wrap for lunches or breakfasts.

231 calories    20 g protein   14 g fat   2.1 g net carbs

These are pretty as is, or would be even fancier with cupcake wrappers. Great for showers or parties.
When making lunches, this recipe is great, since you get a couple of buns to use for other meals too. I used a recipe similar to many of Maria's recipes, so the inspiration is hers. I wanted something light and airy for the bread component in the cup. Excellent results.

Love the recipes I share on this blog? My ebook helps you plan and prep to stay healthy 24/7.   http://www.247lowcarbdiner.com

Get more great recipes at the Low Carbing Among Friends Facebook Page:  https://www.facebook.com/LowCarbingAmongFriends

Order our books at: 


http://amongfriends.us/24-7-LCD.php

Sunday, August 26, 2012

Bread in a Tube

What an amazingly busy life I have lately. The first week of our new educational project is under our belts. We had a successful week, we just need to enroll some more students. My mentor told me they would come, but with so much at stake, it is hard to be patient!

Working full time, and needing to rely on taking my lunch everyday, I am adjusting my Diner schedule somewhat. Lunches are so important--especially when eating in a community room means staying away from the chips, cupcakes and such. I am tweaking my Diner system to accommodate meals for all of us to take to work all week. I think I have a pretty good plan in place, with a rotating weekly lunch menu. I am going to publish my ideas and recipes in this month's Diner News. It will be an issue you don't want to miss if you ever eat away from home. That will go out on September 1.


The bread in the photo is part of that plan. That is my Mr. Peanut Bread baked in a bread tube. I got this years ago from Pampered Chef. It worked beautifully. The bread did not stick at all. It came right out of the tube.I think these tubes have been discontinued, but you can still find them at thrift stores or on e-bay. These little slices are going to be great for finger sandwiches to pack in our lunch. I plan to freeze the bread a little while to make it slice thinly more easily. I couldn't resist cutting it while it was still hot. We are eating the first slices with a little sugarfree strawberry jam. Delish. I have some ideas for a Thai themed chicken salad that should be amazing too. I will let you know! ( I haven't made it yet) I plan to cut the bread into 16 slices. That will make 4 servings for John and I to enjoy. Today we are having strawberry jam, and I will add another cream cheese and jam sandwich later in the week.  Add to that a serving of the chicken salad and one with ham and honey mustard. That will give us some delicious finger food for lunches. Cute little star shaped sandwiches. Just be sure to store the bread in the fridge because it grows mold quickly.

I have lots of other fun little dishes to try out for lunches this week too. I am replacing the cooking I usually do for breakfast with some extras for lunch. I am experimenting with intermittent fasting 4 days a week. Jennifer Eloff, my wonderful editor from the Low Carbing Among Friends--introduced many of us to the idea. I am going with the plan of skipping breakfast and limiting the window of my meals.I have done that most of my life anyway, so this seemed natural to me. The hours between dinner and the next day's lunch equal my fast. I am not going into all the explanations, so if you want to read more, read Jennifer's posts or any number of articles out there.

In the mean time, we will have some great lunches for the work week. If you have any tricks to make brown bagging easier, but sure to send them to me for the newsletter. I love having ideas from my fellow Diners!